So I finally took the plunge and asked somebody to buy for me the latest available CD of Mac OS X Snow Leopard. And he did! Although not strictly "the latest" it was the latest "available" at his point of purchase -- 10.6.3. I thought I'd share for posterity my experience in installing the OS ... So, here goes ... my version of a step-by-step ...
1) Ensured that I backed up my old OS X Leopard files FIRST! Quite quick (about an hour) because I didn't have that many files on my hard disk, being one of those people who backup and delete unused dox, etc., quite regularly. I used the tried-and-trusted Disk Utility method rather than Time Machine.
2) Disconnected ALL peripherals and then bunged in the installation CD and began to follow the prompts ... quite simple and the only worry I had was when, 10 minutes into the install (again -- the whole thing took me just a little bit over an hour because I don't have a huge lot of data) it rebooted without warning. Fortunately I have had experience with other OSs doing this *by design*, so I didn't touch anything and waited patiently for about 30-40 seconds and, right enough, my disk-drive made a slight noise and the install process seamlessly resumed from where it left off.
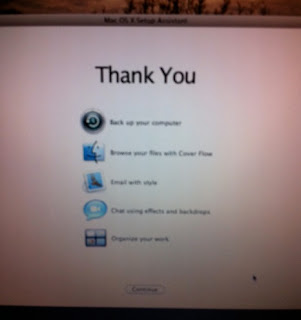
 4) The system then rebooted for the second and last time during the installation (don't remember if it was before I got the Setup Assistant menu or after) and I then received a "Welcome" flash-like presentation in various languages which ended with this pic ...

Quite attractive, I thought!
After it verified for itself that I didn't need any further set-up tweaks, it said ...
 5) I pressed "Continue" and that was it! I got back my own Leopard-personalized desktop, short-cuts and everything! So familiar and comforting! Everything had gone smoothly, I thought -- "Praise be ...!" and thanks to Apple for a painless operation.
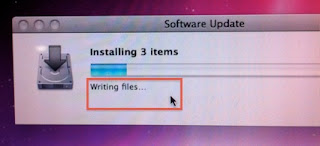
6) I remembered to click through my Apple -> Software Update sequence and ...
 ... the system proceeded to check for new software, which it found and, after I confirmed it, downloaded and installed the first set of updates ...


7) Once that was over and the system restarted, it automatically checked again and found some more updates which were necessary -- including some updated fonts, an update to the DVD utility and other stuff which I allowed it to download and install.
 8) And that was it ... a truly painless experience. Everything just worked! I'm now posting this entry from my new 10.6.7 Mac OS X Snow Leopard!
9) All my old, trusted Apple-compliant software worked; my email and docs were intact; my network passwords and settings remained; my Firefox and Safari bookmarks were intact and even some 'older' non-Apple apps worked. I had to download the updated Gimp and Onyx software but that was child's play.
10) Guess I may need to download some more stuff once I operate the system some more; but for now I'm truly happy with this experience! Thanks again, Apple!
1) Ensured that I backed up my old OS X Leopard files FIRST! Quite quick (about an hour) because I didn't have that many files on my hard disk, being one of those people who backup and delete unused dox, etc., quite regularly. I used the tried-and-trusted Disk Utility method rather than Time Machine.
2) Disconnected ALL peripherals and then bunged in the installation CD and began to follow the prompts ... quite simple and the only worry I had was when, 10 minutes into the install (again -- the whole thing took me just a little bit over an hour because I don't have a huge lot of data) it rebooted without warning. Fortunately I have had experience with other OSs doing this *by design*, so I didn't touch anything and waited patiently for about 30-40 seconds and, right enough, my disk-drive made a slight noise and the install process seamlessly resumed from where it left off.

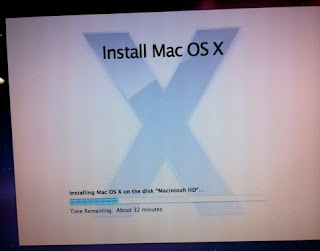
3) When the installation completed (again, me waiting patiently without touching a single key), I got back my very own desktop with a changed menu.


Quite attractive, I thought!
After it verified for itself that I didn't need any further set-up tweaks, it said ...
6) I remembered to click through my Apple -> Software Update sequence and ...


7) Once that was over and the system restarted, it automatically checked again and found some more updates which were necessary -- including some updated fonts, an update to the DVD utility and other stuff which I allowed it to download and install.

9) All my old, trusted Apple-compliant software worked; my email and docs were intact; my network passwords and settings remained; my Firefox and Safari bookmarks were intact and even some 'older' non-Apple apps worked. I had to download the updated Gimp and Onyx software but that was child's play.
10) Guess I may need to download some more stuff once I operate the system some more; but for now I'm truly happy with this experience! Thanks again, Apple!